
In this final part of the snappyHexMesh (SHM) series, I share the very critical (and often the most tedious) part of the mesh generation process – generating boundary layers.
Most users don’t know how this works in SHM.
Reminder: SHM uses a recursive algorithm to generate meshes based on your STL geometry and the base mesh. Much of the process is done by iteration, much like the CFD solver.
If you remember this as you set it up for your specific geometry, it all becomes a lot easier to work with.
If you’ve missed any of the previous parts of this series, take a look here:
Why bother with boundary layers?
The mesh from the castellation and snap stage is technically enough to run a simulation case…
BUT, the most interesting physics happens at the surfaces of your geometry.
Here’s the physics connection:
-
There is a significant and steep change in fluid behaviour near surfaces
-
There is a steep gradient variation in the direction normal to the wall
-
There are strong viscous effects happening here
-
Flow separation happens at surfaces, affecting flow further afield
-
Heat transfer gradients matter here
-
Turbulence is born from near-wall changes
-
The numerical error reduces quickly with distance away from the wall

So, refining the mesh / cells near walls and surfaces allows you to capture these critical flow properties and therefore accurately resolve and model the fluid changes.
A word on Wall Functions
Yes, you don’t always need to do the most expensive thing (generating and solving a fine region for a mesh is computationally expensive!!).
Wall functions are boundary conditions applied to patches (usually in the 0/ folder) to model the near-wall flow without needing a fine mesh / boundary layers.

And OpenFOAM has a number of wall functions available, including nutkWallFunction, nutkRoughWallFunction and omegaWallFunction – to calculate and predict the fluid behaviour.
But before you run off and throw a wall function into your case and abandon this post, remember it comes with limitations:
-
They cannot accurately resolve where the fluid will separate
-
They cannot precisely calculate the heat transfer gradients
-
Not all pressure gradients can be resolved
-
You need a few inflation / layers at surfaces to avoid the abrupt jump for numerical solver calculations to remain stable
Wall functions are still a great way to get are good for bulk flow and simple estimates.
So as you can see, if you care at all about getting practical and valid results from your CFD solver, boundary layers need to be generated.
How to use SHM to generate those much-needed layers
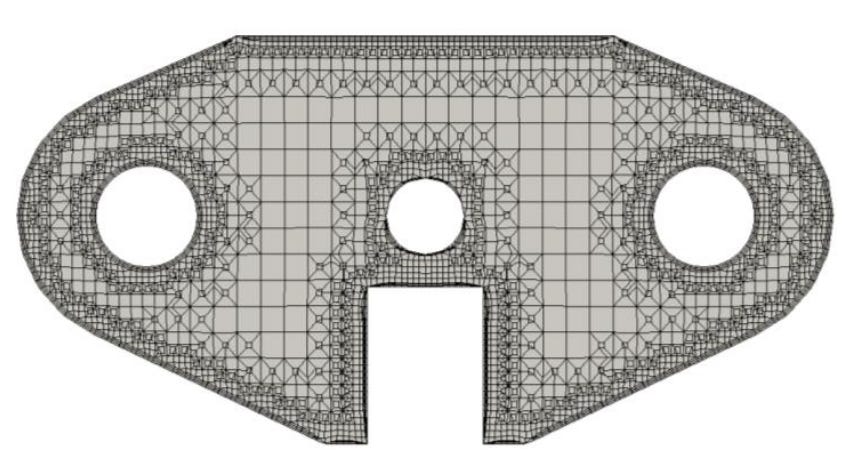
Boundary layer generation using SHM involves activating the option using the addLayers flag in the dictionary file and then setting the specific parameters in the addLayersControls section.
These parameters are very useful for controlling the layer generation itself but also tweaking the calculation and refinement of those layers.
addLayersControls > layers > geom > nSurfaceLayers
-
Used to define the number of layers you’d like to generate at the surfaces
addLayersControls > layers > expansionRatio
-
Controls the subsequent layer height / growth rate
addLayersControls > finalLayerThickness
addLayersControls > minThickness
-
The combination of these two parameters allow you to control the layer thicknesses
addLayersControls > nLayerIter
-
The amount of iterative calculations to relax the layer extrusion process
Why layer extrusion can fail sometimes…
Convex Cells are a nightmare and usually occur at sharp and tight, curved regions of geometry
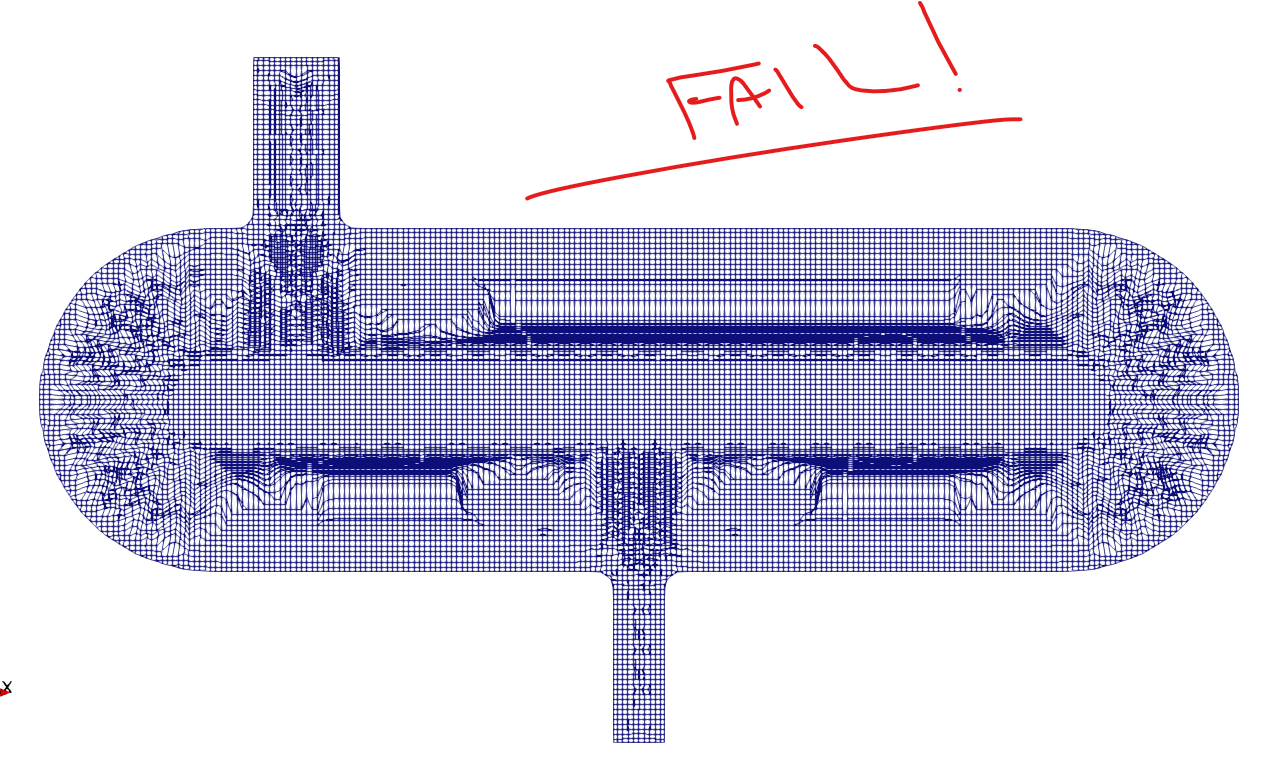
Relaxing the quality settings, in particular “maxConcave” improved the result drastically:
The truth about using snappyHexMesh to generate meshes
I’ve come to find that there is a “pattern” or combination of settings required to get the results you want, depending on your geometry.
These series of posts couldn’t do justice to this key part of the puzzle, so I’ve been busy putting a more comprehensive and concise guide together (now 75% done…)
-
HOW to use snappyHexMesh with clarity
-
HOW I resolved my mesh fail attempt
-
EXACT settings that helped me achieve a great Mesh
-
Little known tweaks I found to drastically improve results
-
More!!
If you found these posts on SHM useful, then you’ll really like the manual I’ve been writing as part of the OpenFOAM Diet series, first launched in September last year.
Some feedback for that manual:

I plan to launch it in the next few weeks (Pre-launch offer below, SAVE 40%):
Stay tuned!